

This is the second in a series of blog posts about gatewaying an office network fronted by PFSense to different cloud vendor's Virtual Private Network(VPN) offerings. Part one covered AWS.
GCP Architecture
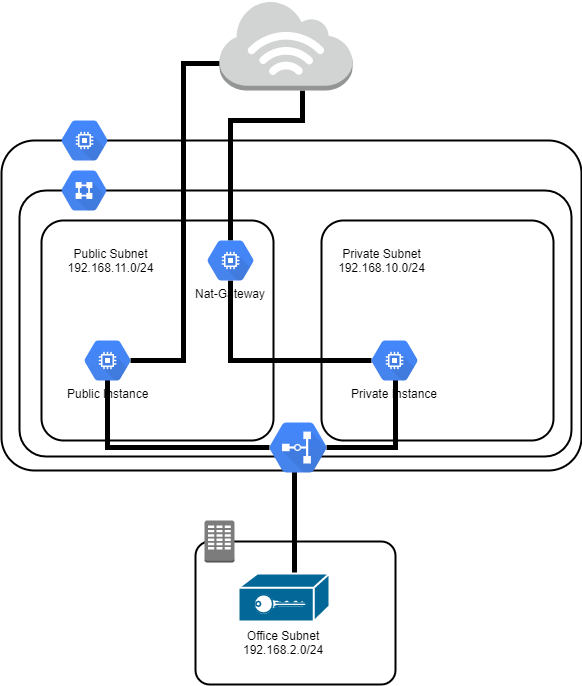
This design is nearly identical to that from the AWS design. It has two subnets and a VPN connection to a remote office. The first subnet will be a public subnet (192.168.11.0/24), and will be used for hosts that have both public and private IPs assigned to them. The second subnet (192.168.10.0/24) will be used as a backend subnet that will have hosts with only private IP addresses - and no direct external connections. Hosts in the public subnet will be able to reach and be reached from the Internet depending on firewall rules. Hosts in the Private Subnet will use an instance configured as a NAT gateway within the Public Subnet to allow them to reach out to the Internet for software packages and patching. Both the Public Subnet and the Private Subnet will be able to communicate with each other.
Creating the VPC
Navigate to the Google Cloud Platform web portal and select VPC Network from the hamburger menu. Click "Create VPC Network" to begin entering information about the VPC you are creating.
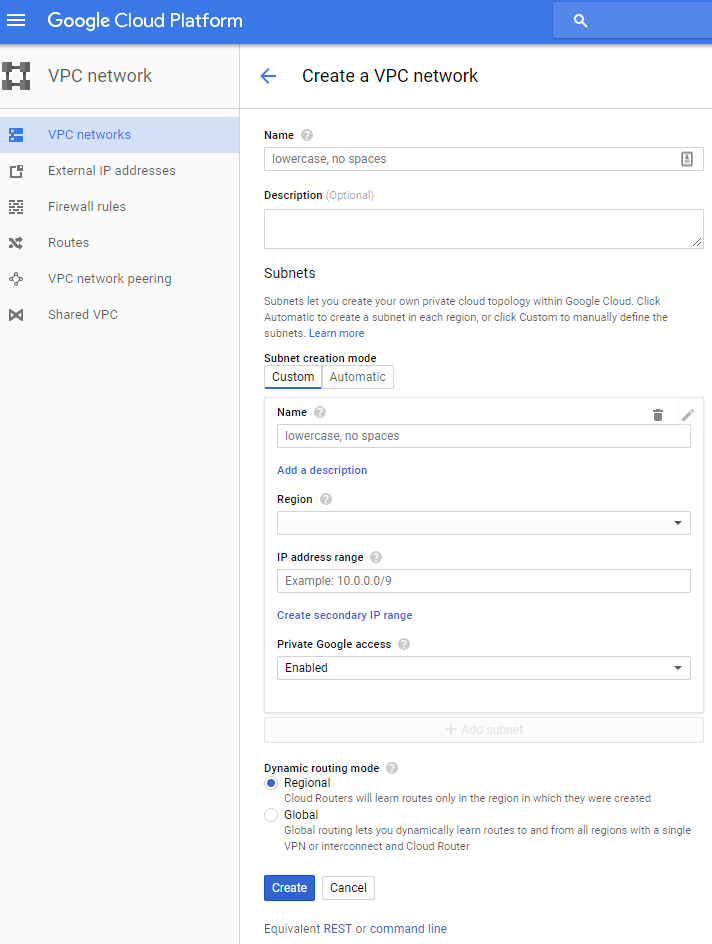
First, enter a name and description for the VPC. We will use the Custom option for subnets to create both the private and public subnets. In the name field, enter "Public Subnet", Select the region you plan to deploy to, and put 192.168.11.0/24 in the IP Range area. I've enabled "Private Google access" for mine as I'd like to be able to access Google cloud services even without a public IP address. Click "Add Subnet" and repeat the above for the Private Subnet, using "Private Subnet" the same region, and the same access setting. For this configuration we will be using the "Reginal" Dynamic Routing Mode. Now click create to build the VPC, it may take a few minutes for everything to get created, but when you are done, you should see something like this in your VPC networks area:

Creating a NAT Instance
Google cloud does not have a NAT appliance. Instead, you create an instance and set it up to be a NAT gateway. One of the nice features of the google cloud web interface is that you can launch a "Cloud Shell" that gives you an instance to run cloud provisioning commands in. While we could do this all through the GUI, for simplicity in directions, we'll use this to create the NAT instance. It needs to be set up allowing IP Forwarding when it is created. See the "--can-ip-forward" flag supplied to the create command below, there is a checkbox in the network interface area of the GUI to allow this if you decide to go that route.
Note, that I've selected the smallest machine type I could. Depending on the load in your environment, this might need to be more powerful. I'd also recommend confirm that you have the latest Debian version, which at the time of writing is Debian 9.
You can list the image versions available using the command below:
gcloud compute images list --filter debian

Fire, up a Cloud Shell and then run a command like the one blow with the correct values for your VPC name and subnet names.
gcloud compute instances create test-nat-gateway --network test --subnet public-test --can-ip-forward --zone us-west1-a --machine-type f1-micro --image-family debian-9 --image-project debian-cloud --tags nat

Create a rule to allow SSH, once the VPN is configured you'll want to go back and change this, but it is useful for getting the NAT instance set up beforehand.
gcloud compute firewall-rules create test-allow-ssh --allow tcp:22 --network test
Create a rule allowing all the instances in the 192.168.10.0/23 network, both the public and private subnets, to talk to each other.
gcloud compute firewall-rules create test-allow-internal --allow tcp:1-65535,udp:1-65535,icmp --source-ranges 192.168.10.0/23 --network test
Create the routing rule that will set the default route for any instance with a network tag "no-ip" to the NAT instance we just created.
gcloud compute routes create test-no-ip-internet-route --network test \ --destination-range 0.0.0.0/0 \ --next-hop-instance test-nat-gateway \ --next-hop-instance-zone us-west1-a \ --tags no-ip --priority 800
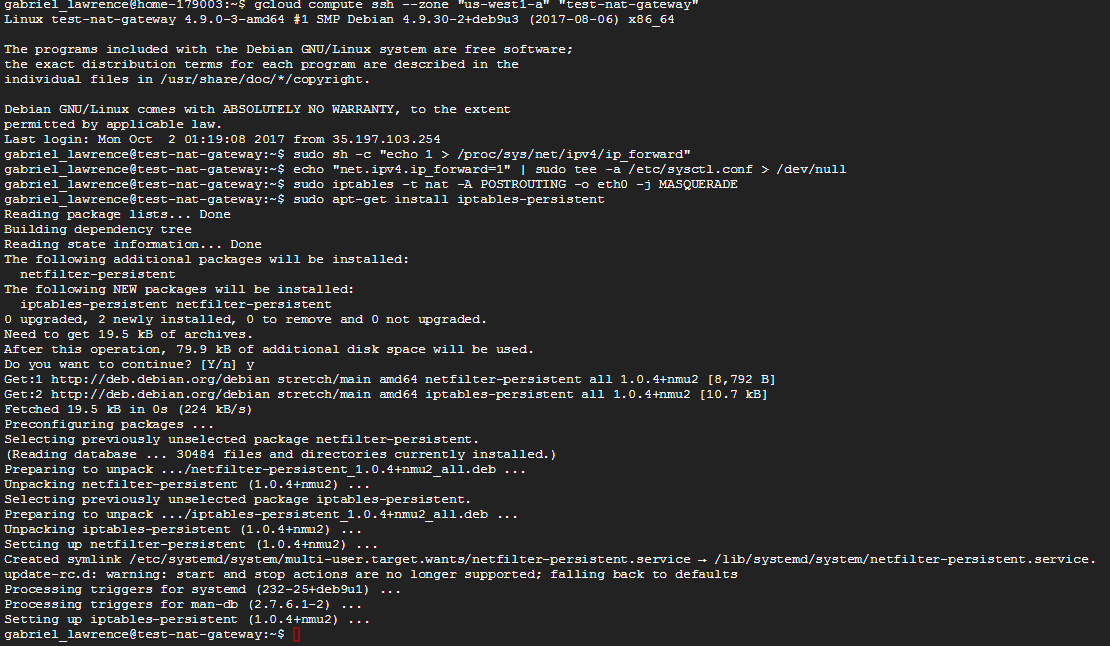
Login to the Nat Gateway to configure network forwarding and NAT.
gcloud compute ssh --zone "us-west1-a" "test-nat-gateway"
Once connected, set up ip forwarding
sudo sh -c "echo 1 > /proc/sys/net/ipv4/ip_forward"
echo "net.ipv4.ip_forward=1" | sudo tee -a /etc/sysctl.conf > /dev/null
Set up NAT address masquerading:
sudo iptables -t nat -A POSTROUTING -o eth0 -j MASQUERADE
sudo apt-get install iptables-persistent
When the persistent package is installing you'll be prompted to save the current rules, select that option.
Create the VPN Connection
Next, navigate to Interconnect/VPN from the services hamburger. We will create the VPN connection by selecting "Create VPN Connection." You will be presented with the following dialog:
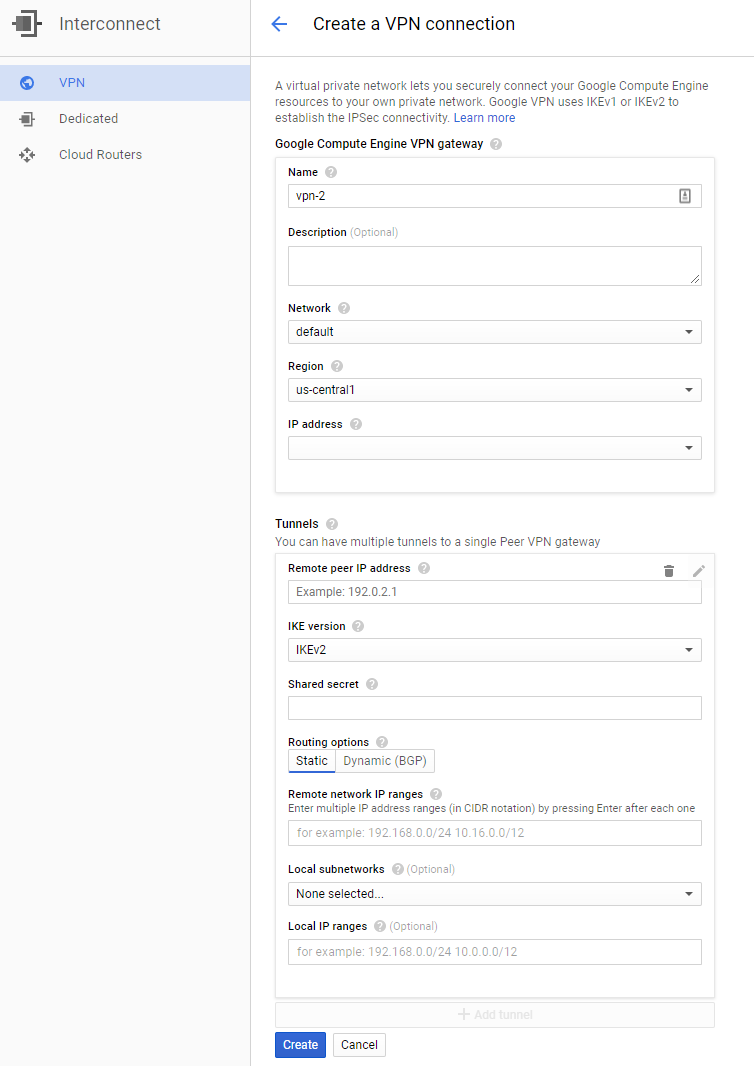
Give your VPN a name and description. Select the VPC we created previously, in my case it is test. Select the region, you selected previously. In this example we've been using us-west-1. Click the drop down for an IP Address and allocate a static IP address to use for your VPN endpoint. Make a note of this, as we'll need to put in the PFSense configuration below.
Configure the Tunnel section. Enter your PFSense VPN IP address on the Remote Peer IP Address. Select IKEv2. Generate a shared secret. The command below can be used to generate a sufficiently random shared secret:
pwgen -s -N 1 -cn 64
After generating this, make a note of it as you'll need to supply it for the PFSense configuration.
This configuration uses Static routing. Enter the office IP range for the Remote Network IP Range. For this example configuration, I would put 192.168.2.0/24 in. Select both the public and private subnets you created for the VPC and click the "Create" button.
Creating firewall Rule to Allow Office Nework in
You'll need to create a rule allowing traffic from your office network into the VPC. This can easily be down from the cloud shell using the following command. Remember you'll need to update at least your network name in the command below to match your configuration.
gcloud compute firewall-rules create all-from-vpn --allow all --network test --source-ranges 192.168.2.0/24
PFSense Configuration
Navigate to VPN/IPSec in the PFSense management console. Click the "Add P1" button to begin configuring the PFSense VPN.
Phase 1
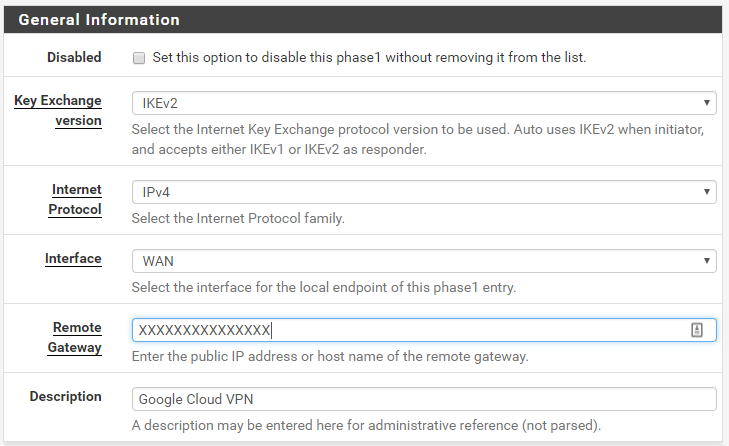
First thing will be to configure the Key Exchange Version. GCP VPNs support IKEv2, so that is what we will select. Use IPv4 and the WAN interface. Enter the IP Address that was assigned to your VPN that you made a note of above in for the "Remote Gateway" and enter a description that will remind you what the VPN configuration is for.
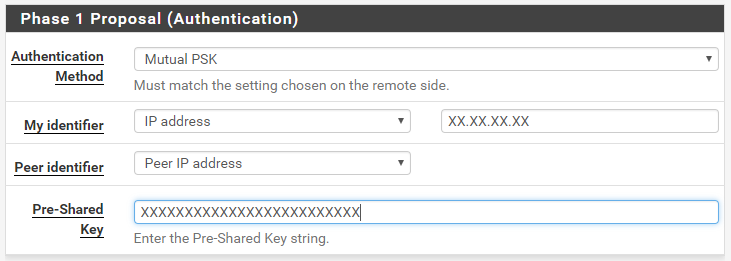
Next, configure the Authentication mechanisms. We will be doing "Mutual PSK." In my configuration, the PFSense router is behind another NAT box. To make Authentication work, I needed to use a specific IP Address for the identifier. If your PFSense box has a public IP, you can just select "My Address" for "My Identifier" otherwise, select "IP Address" and enter in your public IP address. You select "Peer IP Address" as the "Peer identifier" and then enter the pre-shared key you generated above.
The default security algorithms need some adjustment. The values below are the ones that seemed to offer compatibility between PFSense and GCP VPN at the time of writing. You may want to confirm that better options haven't become available when you follow this guide. The Encryption Algorithm should be set to AES 256 bits. The Has Algorithm will be SHA1. We will use DH Group 24 and the Lifetime can remain 36000.

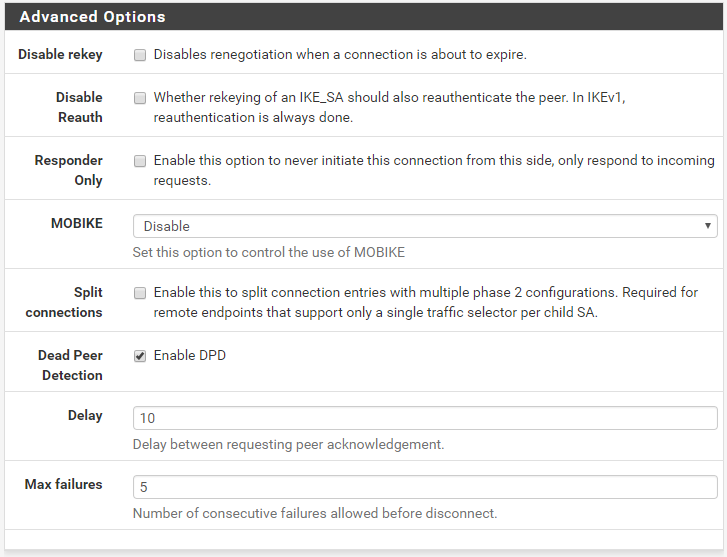
The defaults are fine for the Advanced options.
Phase 2
Click "Save" and then select "Add P2". In the Phase 2 configuration, select "Tunnel IPv4." Local Network should be set to "LAN Subnet." NAT/BINAT can be set to None. Remote Network will be set to Network and the value will be the subnets we configured, 192.168.10.0/23, which covers both 192.168.10.0/24 and 192.168.11.0/24.

Next configure the Phase 2 Proposal settings. We want encryption, so select ESP from the Protocol drop down. Select AES128-GCM and 128 bits for the Encryption Algorithms. Select SHA1 for the Hash Algorithm and, finally, use PFS key Group 16. Once this has been configured you can click save at the bottom.
Starting the VPN Connection
Navigate to Status/IPsec to see the IPSec Status table. If your VPN isn't already connected, press the connect button and the status should quickly update to Established.

My connection is actually from a PFSense instance behind a NAT gateway, so you see the NAT IP of the PFSense WAN address and that it is using NAT-T in the image above. You can also see encryption parameters we selected above and that the VPN is up and running.
Similarly, we can expand the SA entries to see the Phase 2 connection information:

Debugging if you run into problems
If you run into problems, the IPSec VPN in PFSense will generate useful logs that should help you figure out why things might not be working. From the Status/IPSec/Overview screen you can select the "Related Logs" button, or just navigate to Status/System Logs/IP Sec. The IPSec process is charon. The Messages should give you some clues into what might not be working.
In addition, the Google Cloud Platform web interface offers useful logs as well. If you navigate to Interconnect/VPN and click view in the Logs column for your VPN configuration you should be able to see pretty detailed logs that hopefully will guide you to a solution.
Firewall Rules
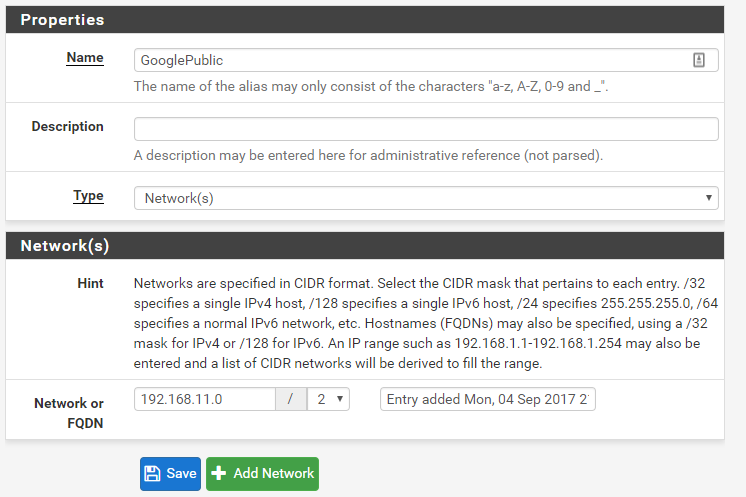
You'll need to create rules that allow traffic from the IPSec VPN to your network. First, we'll create some aliases in PFSense to make it easier to remember what the ranges are. Navigate to Firewall/Aliases/IP and create a new entry. Configure it as follows:
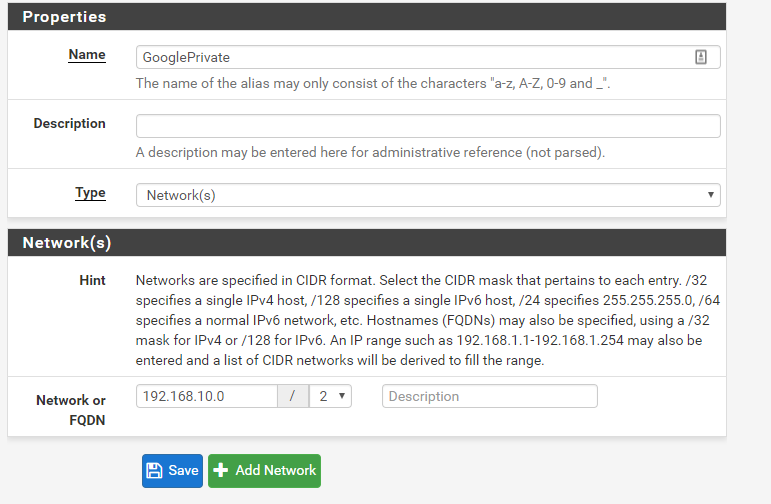
Similarly, do the same for the private network:
Now, navigate to Firewall/Rules/IPSec section. We will create a rule to block all access from the public subnet to our internal network. Add a rule to the table and fill in the values as shown below:

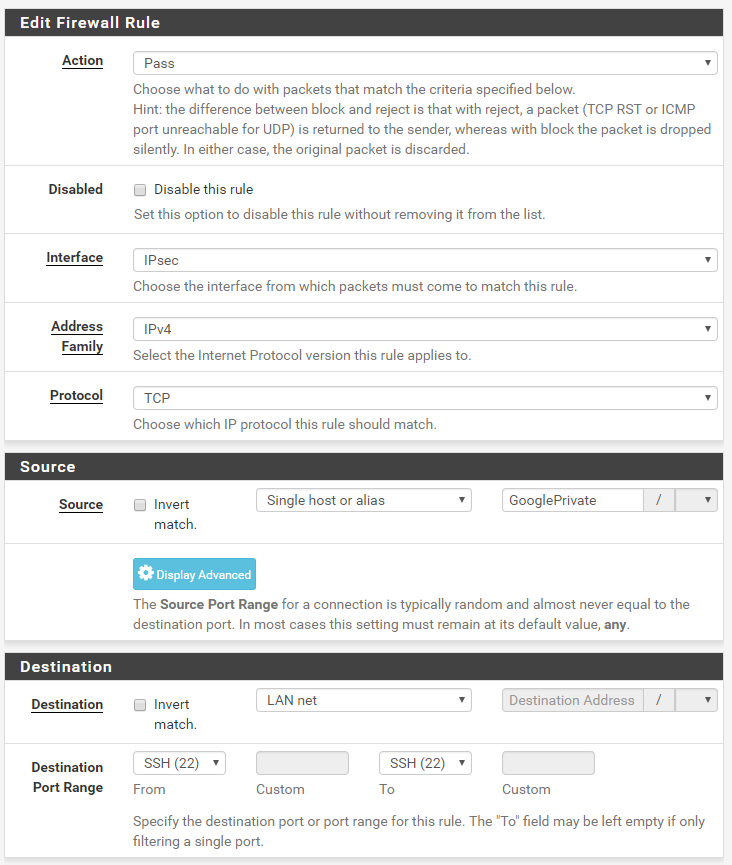
If you want machines in your Private AWS range to be able to access systems in the LAN network, you'll have to create rules to allow that. I've allowed SSH in in the example below, but you should adapt it to your needs:
Finally, just to be explicit, I've added a catch all block rule at the end to block all traffic from the IPSec tunnels to the LAN network:

With the end ordering of rules being what is shown below:

In future posts, I'll cover the same thing for both Azure and Google Cloud.